Monday, February 27, 2012

Shrimp & Avocado Lettuce Cups (with heat!)

By:  Maria


Be prepared to have plenty of fire-extinguishing water nearby. This dish has some serious heat - if that frightens you, reduce or even eliminate the peppers; if your taste buds are drooling at the mere thought of the fiery heat, read on!

Ingredients
1 pound extra large shrimp, peeled and deveined
2 heads butter lettuce, rinsed and leaves separated
4 jalapeno peppers
3 cloves garlic, minced
1 Tbs. cumin seeds
1 Tbs. coriander seeds
1/2 cup chopped cilantro, plus more for garnish
4 Tbs. extra-virgin olive oil, plus 1 Tbs.
1 tsp coarse salt
1 tsp freshly ground pepper
1 red bell pepper, diced
1 avocado, diced
1 lime

Preheat the oven to 400.
In a skillet, toast the cumin and coriander seeds until fragrant (sure, you could omit this step, but be prepared for zzzzz flavors).
On a rimmed baking sheet, toss the peppers with a little oil. Roast for 20 minutes, or until pretty charred on all sides.
Remove from heat and let cool for a few minutes. Chop 'em up.
Dump the toasted cumin seeds, coriander, minced garlic and salt in a food processor and process until finely ground and pasty. Toss in the peppers and pulse until well blended. Add the cilantro and olive oil and pulse once more. (feel the heat, folks!)
Toss the marinade with the shrimp and let sit a few minutes.
Heat skillet over medium-high (adding coconut oil or ghee is an option here). Arrange the shrimp in a single layer and sear 2 minutes. Flip and sear 30 more seconds. Remove from pan and set aside.
Add a little more oil if needed and add the red bell pepper. Saute 2 minutes.
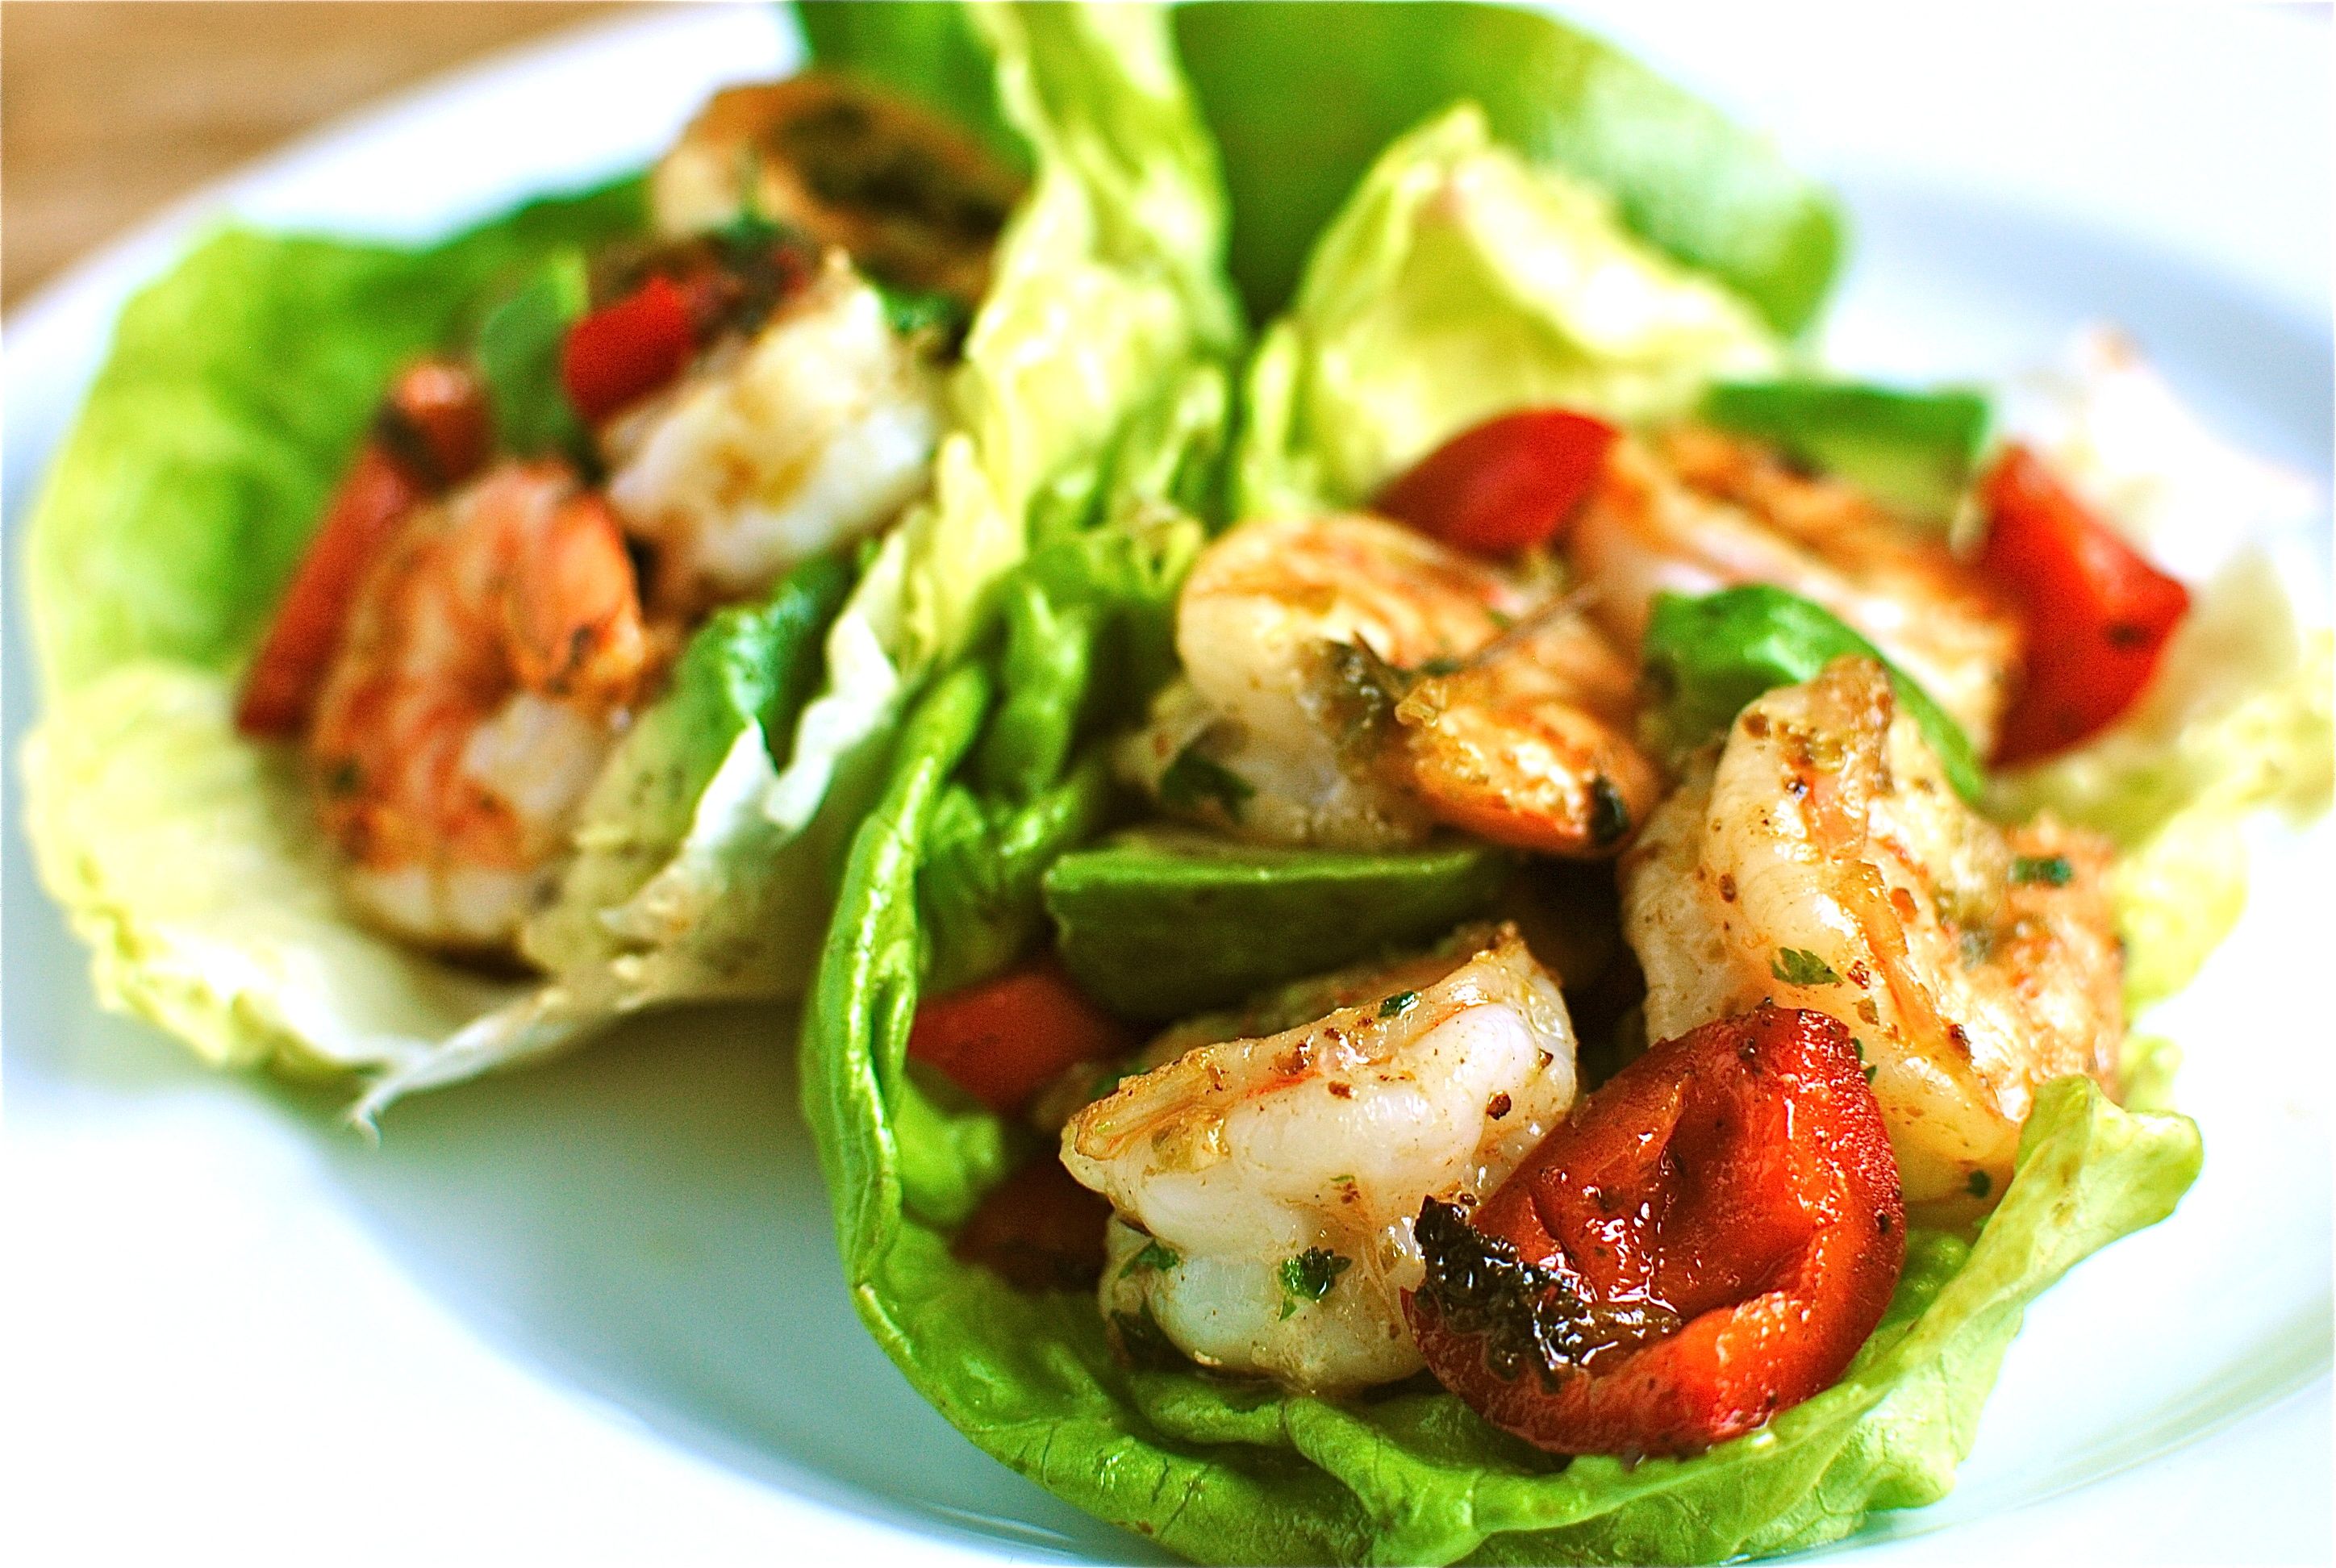
Stuff each lettuce cup with shrimp, red bell pepper and diced avocado. Drizzle with lime and find your fire extinguisher!
Enjoy!
photo courtesy of anniedallie


Thursday, February 23, 2012

Diabetes Testimonial

By:  Maria


Eating a diet full of real foods and avoiding processed foods can mean more for your health than simply losing weight or becoming lean, it can have life-altering effects as well.
Read on:

Our son, Brandon*, has type 1 diabetes. He was diagnosed when he was 3 and is currently on an insulin pump to help manage it. His numbers have always fluctuated, daily, anywhere from the teens all the way to the 500’s. We have always been told that this is completely normal, that as a kid this is to be expected and, most importantly, that there is nothing we can do about it. This has always frustrated us, as parents, because we know that there are major long term issues that can be caused in Brandon's body, due to high or low blood sugar numbers now.
Never have we been told by any of his 3 endocrinologists in 4 years that cutting out processed sugar or wheat would be something to consider to keep his blood sugar more tightly under control. I realize not every parent wants to do this, I’m sure we wouldn’t have wanted to do this a couple of years ago, but knowing what I know now (and that’s really not a lot) I very
much wish a doctor had at least mentioned this as an option to consider. Although this idea may seem out there to some (only eating natural sugars, not processed
sugar, and no
wheat!) it is an option to be considered to bring blood sugar numbers into the PERFECT range. Let me say that again.
The PERFECT range.
The numbers speak for themselves. Here are Brandon’s blood sugar numbers the 3 days before we started our real-food-only challenge: 214, 37, 117, 279, 411, 279, 36, 57, 26, 43, 139, 276, 235, 253, 53, 376, 411, 173, 124, 204.
Here are the PERFECT numbers he has had the last 3 days (They have been perfect actually the last 7 days): 108, 75, 120, 80, 72, 84, 73, 70, 113, 79, 78, 76, 146, 82, 154, 76, 119, 87, 125, 103, 107, 79, 98, 87.
I am blown away. I am overwhelmed. PERFECT numbers.
To know that I have found a way to make sure that Brandon’s body is being cared for in the absolute best way (just by cutting out food that isn’t good for anyone anyways) I feel like I can breathe easier. I am so thankful to God for the journey He has brought me on…and now my family… that we at the place to be receptive to all of this, and thriving in it. I am also extremely
thankful to have friends who have been kind enough to patiently share their wisdom and research with us. I know we wouldn’t be where we are today, without them.
So…..we continue on our 30 day real food challenge. We have already learned so much and I am fully expecting that we will be learning a whole lot more as we continue. I also expect that when I share these numbers with Brandon’s medical team, and explain how we got here, that they will be just as blown away as I am.
Thank you!

*Name has been changed for privacy

Monday, February 20, 2012

Noodle-Free Lasagna

By:  Maria


The word Lasagna evokes an image of layer-after-layer full of melted cheese oozing between noodles. Everyone enjoys a hearty dish of lasagna - right?
What we don't enjoy, are the after-effects brought on by cheese and the insulin load created by the noodles.  Our guts experience bloating - from very mild to loosening-of-the-belt uncomfortable - leaving us wondering why did I eat that??

I'm here to give you some good news; you can make and enjoy a tasty lasagna that will leave you satisfied but will be devoid of those uncomfortable side effects.

Replacing the noodles with nutrient dense butternut squash is genius!  If you've never tried it, I encourage you to do so - it's delicious!  Your taste buds will be hit with sweet, tangy and mildly salty flavors all rolled into one bite.

Ingredients
1lb of your favorite hot or mild sausage (preferably nitrite/nitrate free)
1 red onion
3 garlic cloves
1 15 oz tomato sauce (season with your favorite spices)
1 cup roasted red peppers (you can purchase these in a jar or roast your own)
1/4 c extra virgin olive oil
a few fresh basil leaves
1 butternut squash

Preheat oven to 400 degrees F.
Grease the inside of 12 muffin cups or a baking pan (I like to use muffin cups for individual sized portions, especially for the little kiddos in the household)

Saute sausage, onion and garlic until browned.


Meanwhile, cut the top and ends of the squash off and peel it. Cut in half lengthwise and cut those two in half width-wise (as shown in photo).  Spoon out seeds.  Don't worry about getting every little string out - it won't matter once it's baked.  Slice the squash into small slices that will fit in a muffin cup.


Make the sauce by pureeing the tomato sauce, red peppers, olive oil and basil in a food processor or immersion blender.


Pour just enough sauce into each of the muffin cups to lightly cover bottom.  


Next add the squash


Top with some sausage mixture, followed by the sauce.  Repeat until all ingredients are used - reserve enough sauce to cover top of lasagna.


Bake for 45 minutes or until the top is bubbly and crispy. Let it set for about 10 minutes before digging in to eat so it will solidify.


squash  photo courtesy of k.lineberger

Thursday, February 16, 2012

Meat CSA

By:  Maria


The most common form of Community Supported Agriculture (CSA) is a vegetable/produce CSA in which a customer buys a share of the year's crop in exchange for paying at the beginning of the season (read more here). Each CSA varies in quantity, quality and price.  CSA's differ from food co-ops, which can be equivalent to the produce you get at the grocery store (i.e., it's been shipped from far away and long ago and the quality is sometimes questionable); so it's important to do a bit of research prior to deciding between a CSA or food co-op.
Personally, I opt for the CSA.  Not only am I supporting our local farmers, but I am assured quality produce that is seasonal and fresh.

What you may not realize, is that there are also meat CSA's!
Not only do you get the convenience of getting a box full of pre-ordered meats, but you get the most nutritious meat that comes from a family farm; raising their animals ethically, feeding them what they were meant to eat.  No antibiotics, no hormones, no stressed animals.  You can eat knowing that your meat came from animals that were allowed to roam pastures, eat grass, breathe fresh air and generally lead a happy life - the complete opposite with meat from animals purchased at local grocery stores.  The families not only welcome visitors to their farms, they even encourage you to do so (there's a reason why the public is not invited or encouraged to visit factory farmed cows and chickens, folks!)

Two such farms are local and provide CSA shares (click on names for info on prices and delivery locations):

and

I have been a long-time customer of Lau Family Farm; where I get my beef and lamb products and am eager to order my chickens and uncured bacon from Christiansen Family Farm.

Give it a try!

Monday, February 13, 2012

No-Bake Nutty Bites

By:  Maria


These little gluten-free, dairy-free bites are just the right size for when you want a small treat, without worrying about completely sabotaging your nutrition endeavors. I save these type of goodies for weekend-only treats.
The chocolate* used is also dairy-free, soy-free, gluten-free and adds a nice touch, but is completely optional.

Ingredients

2 ½ cups blanched almond flour
½ tsp sea salt
¼ cup raw honey
½ cup toasted sunflower seed oil
1 tblsp vanilla
1 cup gluten, soy & dairy free chocolate chips (optional)

In a large bowl, combine almond flour and salt
In a smaller bowl, combine sunflower seed oil, honey and vanilla
Stir wet ingredients into dry
Shape into log size
Wrap tightly in plastic wrap
Chill dough in freezer for 30 minutes
Slice log into 1/4-inch thick slices (I cut those slices in half for smaller portion-sized treat, but it's up to you)
Bake at 350° on a parchment lined baking sheet for 5-7 minutes or until brown around the edges
Cool for ½ hour

If you decide to dip into chocolate:

In a small saucepan, melt chocolate over very low heat, stirring continuously
Remove saucepan from heat and one by one, dip into chocolate
Set to cool on a parchment lined baking sheet --refrigerate to harden chocolate
I find that they tend not to crumble easily if I keep these treats in the fridge

*(You can find Good Life brand of chocolate chips @ your local Nutrition store or Harmons)


Thursday, February 9, 2012

A Week in the Life

By:  Maria


I often get asked about my typical day of eating. 

What do you eat for breakfast?
For lunch?
For dinner?
What do you snack on?
Do you eat the same thing every day? (hint: NO!)

My day-to-day menu varies constantly, because I like variety, I love to experiment in the kitchen and I enjoy passing along my delicious discoveries with all of you!

The following is a typical week of eating:


Monday
Brkfst:
3 egg omelet
1 cup roasted brussel sprouts w/ bacon
Water

Snack:
6 oz. homemade bone broth
w/ 1 tsp homemade ghee
banana  

Lunch:
Leftover roasted pumpkin soup
3 oz. rotisserie chicken
Water 

Dinner:
Huge bowl of beef stew w/ grassfed beef made with homemade bone broth
Water

Tuesday 

Brkfst:
Leftover beef stew
Water

Snack:
Jjicama slices
w/ almond butter
½ c homemade bone broth

Lunch:
Junk salad:
Assorted greens, chicken, roasted onions and peppers, homemade sun dried tomato dressing, homemade guacamole.
water 

Snack:
Handful of sunflower seeds 

Dinner:
Grassfed Tri-tip w/ chipotle marinade
Sauteed cabbage with onions, homemade ghee, seasoning
Water

Wednesday

Intermittent Fast Day (1x/week) – no food until Lunch 

Lunch:
Grassfed Meatball soup (meatballs made with seasonings, finely chopped cauliflower boiled in bone broth)
Water

Dinner:
Bacon wrapped meatloaf bundles with sun-dried tomato pesto
Sautéed (in ghee) kale with onions and seasoning
Water

Thursday

Brkfst:
Leftover meatloaf bundles w/ roasted broccoli

Snack:
6 oz. bone broth with melted ghee

Lunch:
Leftover grassfed stew
Water 

Dinner:
Macadamia Crusted Salmon
Roasted seasoned green beans
Orange slices
Water

Friday

Brkfst:
Leftover Salmon
Roasted green beans
Coffee (decaf)

 Lunch:
2 sunny-side eggs (from our hens) dumped over baked sweet potatoes
Avocado slices
Water 

Snack:
Homemade fruit/nut bar
Water

Dinner:
Crockpot Chicken Thighs with sun dried tomato pesto
Jicama/Red Cabbage slaw
Water
 
Dessert:
Homemade apple crisp w/ 1 scoop vanilla ice cream
 

Saturday

Brkfst:
Gluten-free crepes w/ fruit “syrup”
2 scrambled eggs (from our hens)
Coffee (decaf)

Lunch:
Leftover Chicken Thighs w/ sun dried tomato pesto
Orange slices
Water
 
Snack:
Coffee
Homemade pizzelles


Dinner:
Gluten-free Pizza (almond flour crust, marinara sauce, roasted veggies, homemade sausage)
Water

Dessert:
Leftover apple-crisp
 

Sunday
Brkfst:
Egg muffins wrapped in bacon
Decaf coffee

Snack:
Tuna
Handful of pistachios
Water

Lunch:
Grilled shrimp
w/ fresh avocado salsa
over sautéed garlic kale
 

Dinner:
Whole roasted rosemary chicken
Sweet potato rounds baked
Small salad w/ balsamic/olive oil dressing

What are you eating each week?

Tuesday, February 7, 2012

Ghee

By:  Maria


Ghee is a delicious food.
Ghee is butter that has been gently heated to a clear, golden color. For those that are casein/lactose intolerant - no worries - all milk solids are removed in the heating process. Milk proteins (casein and whey) do some bad stuff in our bodies. The milk proteins are pro-inflammatory, and contribute to cardiovascular disease, auto-immune disorders and cancer.
Unlike some other oils (i.e., olive oil), ghee has a high smoke point, which makes it great for cooking (The smoke point determines when an oil actually starts to burn and release free radicals due to oxidation). The very low oxidation rate means you can leave ghee unrefrigerated.

When I can't get my hands on butter from a grass-fed cow, I prefer to use organic butter; since it is free of rBST and other additives found in regular butter.

The uses are varied, but always delicious. I use ghee to scramble eggs or make omelets, flavor my bowl of soup or bone broth, saute veggies or use in my pancake recipe.
The flavor is ghee-licious! A nutty, almost caramel flavor that you simply cannot get from butter.

The fun part comes when you begin to flavor your ghee with things like garlic, cinnamon, cardamom or even oregano, basil or rosemary. The possibilities are truly endless and all infused flavors have turned out beautifully.

You can purchase ghee, yes, but it can be expensive. If you're budget-minded like I am, making your own is not only easy; you are able to choose the quality of butter used and, like most things made at home, it simply tastes better.

Ingredients

1 lb unsalted grass-fed or organic butter


Preheat oven to 225.
Place butter in a glass baking dish and place in oven.

Heat until the butter fully separates and a clear golden liquid is on top (the solids you see in the photo above should eventually drop to the bottom). This may take an hour or slightly longer, depending on oven temperature.
Remove from heat once the color is a clear gold color.

Line a sieve with cheesecloth or even a coffee filter and place over a new pot or glass bowl. While still hot, carefully pour separated butter through cheesecloth-lined sieve so the milk solids are caught in the cheesecloth.

Toss the cheesecloth with caught milk solids into garbage, but pour the strained ghee into a glass container (the canning jars work great).
Let ghee cool at room temperature and cover.
It will keep for many months.

Thursday, February 2, 2012

Egg-in-a-Nest

By: Maria


Sometimes, figuring out how to properly fuel our bodies for the rigors of endurance-type training or a workout that you know will be tough, can be confusing. You want to have sustained energy without leaving you feeling uncomfortably full; you want that fuel to provide a constant level of energy, not to have a sudden peak that drops off dramatically and leaves you feeling sluggish in the middle of your training session.
The same confusion applies during our recovery phase. You have empty glycogen stores that need filling up quickly, in order to recover efficiently and fuel for next time, but how to consume the right combination of macro nutrients isn't always understood.
This recipe fits the bill for both situations. The protein & carb combination is exactly what is needed for the longer training sessions but it will also aid in efficient recovery after training as well.
Eat up!

 Ingredients
Serves 4

Serving size: 2 egg nests

2 large sweet potatoes, peeled and grated
sea salt to taste
seasonings of choice
coconut oil
sea salt to taste
8 eggs
4 slices of bacon or quality sausage (no nitrite/nitrate/hormones/etc.), diced

Preheat the oven to 350°F. Grease a muffin pan thoroughly with a little bit of coconut oil.
Mix the grated sweet potatoes with your choice of seasonings (I chose onion powder, garlic powder, sea salt, Italian seasoning).

This nifty peeler is my favorite when wanting thin strips - it works on veggies and fruit and it's awesome!  Although you can use a regular peeler or grater for this recipe, I love the look this peeler produces!


Add your choice of seasoning to the shredded sweet potato and mix.


Using your hands, press the grated sweet potatoes into each muffin cup making sure the bottom and sides are completely covered. Press down firmly creating a potato “nest.” Bake the sweet potatoes for 25-30 minutes.


While potato baskets are baking, cook the diced bacon/sausage, drain and set aside. Remove potato nests from the oven, place a few bacon/sausage pieces in the bottom of each.


Top with an egg.


Return to oven and bake until the egg whats are set, but yolk is still slightly runny, about 10 minutes.